Production Sitecore 10 AWS EKS deploys - connecting VPCs

March 2021

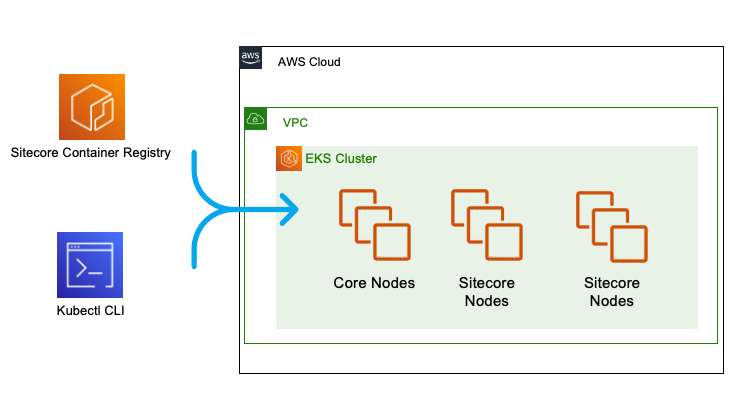
In an out-of-the-box Sitecore 10 Kubernetes install, we have one or more core nodes (the Kubernetes control plane) along with one or more Sitecore application-tier nodes, containing pods for the various Sitecore roles (CD, CM, SQL, Solr):

img

The next step in readying a Kubernetes-powered AWS EKS Sitecore 10 deployment for deployment is moving the data services (Solr, MS SQL) outside of the Kubernetes cluster.

info

In this blog post, we look at how to separate our Sitecore 10 data services (SQL Server) from our main EKS cluster using separate VPCs

While the Kubernetes product develops a capability for running stateful workloads, it is still best practice to keep Kubernetes for your stateless compute tasks, and run databases outside of the cluster.

Options on AWS#

There are two mainstream options available to host your SQL Server instance on AWS. Both have pros and cons, and we'll quickly summarise here.

AWS RDS#

img

RDS is a managed database product. A SQL Server instance can be provisioned through the usual channels (AWS Console, AWS CLI) and the infrastructure management (including backups) is taken care of.

Pros#
  • Low administration burden, easy scaling, easy multi-AZ setup, automated backups and snapshots
Cons#
  • AWS does not grant you an administrator account with all abilities. Running the Sitecore 10 Kubernetes mssql-init job against an RDS database will surface many permissions errors.
The database settings cannot be modified. You must be a SysAdmin to apply these settings.
Procedure sys.sp_configure, Line 105
User does not have permission to perform this action.
Deployed Sitecore.Experienceforms database
Start creating database 'Sitecore.Master' with azure elastic pool 'pool'
Msg 102, Level 15, State 1, Server, Line 2
Incorrect syntax near '('.
Msg 12824, Level 16, State 1, Server, Line 1
The sp_configure value 'contained database authentication' must be set to 1 in order to alter a contained database. You may need to use RECONFIGURE to set the value_in_use.
Msg 5069, Level 16, State 1, Server , Line 1
ALTER DATABASE statement failed.
You can only create a user with a password in a contained database.
Msg 15410, Level 11, State 1, Server, Procedure sp_addrolemember, Line 35
The sp_configure value 'contained database authentication' must be set to 1 in order to alter a contained database. You may need to use RECONFIGURE to set the value_in_use.
You do not have permission to run the RECONFIGURE statement

Workarounds exist, but the main path to production deployment is still the import of an existing Sitecore database into RDS - which won't suit all workflows.

SQL Server on Amazon EC2 instances#

img

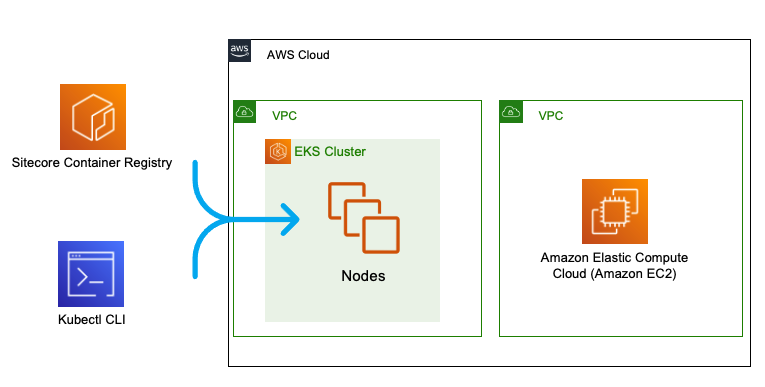
Both Windows and Linux instance can now run SQL Server, so this is a great fallback option for when you don't want to re-work installation processes to be compatible with RDS.

img

Pros#
  • Full control, simply a database in the cloud
  • Can use existing Sitecore 10 database initialisation methods
Cons#
  • Administration burden. Backups, scaling, failover - they're all on you.

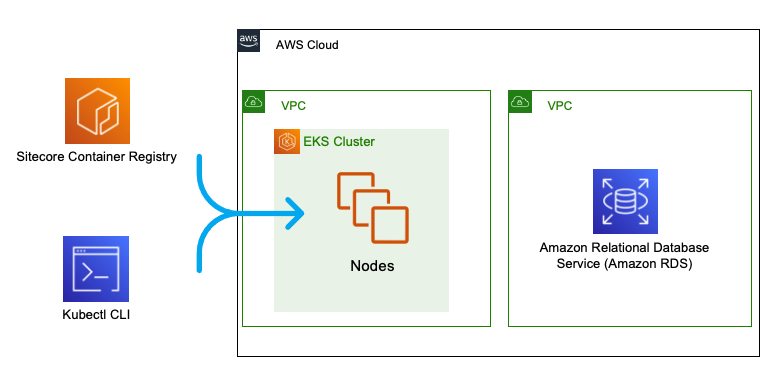
A common configuration - separate VPCs#

info

In this section, we show how to separate your cluster VPC from your MS SQL VPC

Whichever approach you choose, it is a common security and management practice to run your database workloads in a separate VPC to your EKS cluster. You may want the safety of a different security profile for your database, or monitor the VPCs using separate tooling.

Connecting an RDS VPC to your Sitecore EKS cluster#

Create the RDS SQL instance#

1a. Install jq to Powershell - we'll use this to view the outputs of our AWS service creation

chocolatey install jq

1b. Create a VPC to hold your Sitecore 10 RDS SQL Service

aws ec2 create-vpc --cidr-block 10.0.0.0/24 | jq '{VpcId:.Vpc.VpcId,CidrBlock:.Vpc.CidrBlock}'
{
"VpcId": "vpc-042e31c800d705e90",
"CidrBlock": "10.0.0.0/24"
}

1c. Store the VPC ID as an environment variable for later use

$Env:RDS_VPC_ID="vpc-042e31c800d705e90"

1d. Create a subnet in each of two availability zones (eu-north-1a, eu-north-1b), to ensure high availability

aws ec2 create-subnet --availability-zone "eu-north-1b" --vpc-id $Env:RDS_VPC_ID --cidr-block 10.0.0.0/25 | jq '{SubnetId:.Subnet.SubnetId,AvailabilityZone:.Subnet.AvailabilityZone,CidrBlock:.Subnet.CidrBlock,VpcId:.Subnet.VpcId}'
{
"SubnetId": "subnet-01daf18fc42f6c2bd",
"AvailabilityZone": "eu-north-1b",
"CidrBlock": "10.0.0.0/25",
"VpcId": "vpc-042e31c800d705e90"
}

1e. And now, the second subnet

aws ec2 create-subnet --availability-zone "eu-north-1a" --vpc-id $Env:RDS_VPC_ID --cidr-block 10.0.0.128/25 | jq '{SubnetId:.Subnet.SubnetId,AvailabilityZone:.Subnet.AvailabilityZone,CidrBlock:.Subnet.CidrBlock,VpcId:.Subnet.VpcId}'
{
"SubnetId": "subnet-00f49bdd3203cb732",
"AvailabilityZone": "eu-north-1a",
"CidrBlock": "10.0.0.128/25",
"VpcId": "vpc-042e31c800d705e90"
}

Our VPC has a router containing a set of rules used to send network traffic arriving from our subnets. We need to associate our RDS VPC with our newly created subnets.

1f. First, get the ID of our VPC's route table:

aws ec2 describe-route-tables --filters Name=vpc-id,Values=$Env:RDS_VPC_ID | jq '.RouteTables[0].RouteTableId'
"rtb-050e1e8f978fee960"

1g. Store this as an environment variable for later use

$Env:RDS_ROUTE_TABLE_ID="rtb-050e1e8f978fee960"

1h. Now, associate the route table with our first subnet

aws ec2 associate-route-table --route-table-id rtb-050e1e8f978fee960 --subnet-id subnet-01daf18fc42f6c2bd
{
"AssociationId": "rtbassoc-07f702e789e9bf0d4",
"AssociationState": {
"State": "associated"
}
}

1i. Associate the route table with our second subnet

aws ec2 associate-route-table --route-table-id rtb-050e1e8f978fee960 --subnet-id subnet-00f49bdd3203cb732
{
"AssociationId": "rtbassoc-066ebfe75585b5f6f",
"AssociationState": {
"State": "associated"
}
}

1j. Our RDS database instance won't want to concern itself with individual subnets. Rather, let's create a subnet group we can later associate with RDS.

aws rds create-db-subnet-group --db-subnet-group-name "SitecoreDBSubnetGroup" --db-subnet-group-description "Sitecore DB Group" --subnet-ids "subnet-01daf18fc42f6c2bd" "subnet-00f49bdd3203cb732" | jq '{DBSubnetGroupName:.DBSubnetGroup.DBSubnetGroupName,VpcId:.DBSubnetGroup.VpcId,Subnets:.DBSubnetGroup.Subnets[].SubnetIdentifier}'
{
"DBSubnetGroupName": "sitecoredbsubnetgroup",
"VpcId": "vpc-042e31c800d705e90",
"Subnets": "subnet-00f49bdd3203cb732"
}
{
"DBSubnetGroupName": "sitecoredbsubnetgroup",
"VpcId": "vpc-042e31c800d705e90",
"Subnets": "subnet-01daf18fc42f6c2bd"
}

1k. Now, our network rules are all complete! The last thing we have to do is create a security group which we'll use to allow network traffic to pass through (think inbound firewall rule here)

aws ec2 create-security-group --group-name SitecoreRDSSecurityGroup --description "Sitecore RDS security group" --vpc-id $Env:RDS_VPC_ID
{
"GroupId": "sg-0e5793a6db4279154"
}

1l. Add this newly created security group ID as an environment variable

$Env:RDS_VPC_SECURITY_GROUP_ID="sg-0e5793a6db4279154"

1m. With our plumbing complete, we can finally create a SQL Server instance in RDS to hold our Sitecore databases

aws rds create-db-instance `
--db-instance-identifier sitecorerdsmssqldbdbinstance `
--allocated-storage 20 `
--db-instance-class db.t3.small `
--engine sqlserver-ex `
--engine-version "15.00.4073.23.v1" `
--master-username admin `
--storage-type standard `
--master-user-password YOUR_PASSWORD `
--no-publicly-accessible `
--vpc-security-group-ids $Env:RDS_VPC_SECURITY_GROUP_ID `
--db-subnet-group-name "sitecoredbsubnetgroup" `
--availability-zone eu-north-1b `
--port 1433 | jq '{DBInstanceIdentifier:.DBInstance.DBInstanceIdentifier,Engine:.DBInstance.Engine,DBName:.DBInstance.DBName,VpcSecurityGroups:.DBInstance.VpcSecurityGroups,EngineVersion:.DBInstance.EngineVersion,PubliclyAccessible:.DBInstance.PubliclyAccessible}'
{
"DBInstanceIdentifier": "sitecorerdsmssqldbdbinstance",
"Engine": "sqlserver-ex",
"DBName": null,
"VpcSecurityGroups": [
{
"VpcSecurityGroupId": "sg-0e5793a6db4279154",
"Status": "active"
}
],
"EngineVersion": "15.00.4073.23.v1",
"PubliclyAccessible": false
}
Creating the Sitecore EKS cluster#

2a. Now that our database instance is in-place, let's create an EKS cluster to host Sitecore, in a different VPC

eksctl create cluster --name sitecore-cluster

2b. Once complete, head to RDS in the AWS Console, and find the Endpoint URL of our new RDS SQL instance.

img

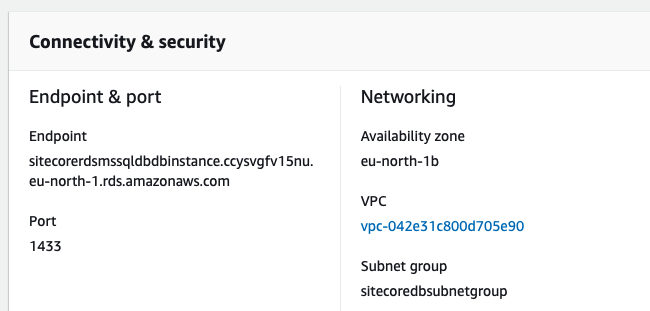
We can use this Endpoint URL to create an alias within our cluster, called sql-sitecore. Using this alias, Sitecore containers can connect to our SQL Server instance using the server name sql-sitecore as if it's on a local network.

2c. Create a new Kubernetes manifest file called sql-sitecore.yaml with the following content (remembering to replace externalName with your RDS Endpoint URL)

# sql-sitecore.yaml
apiVersion: v1
kind: Service
metadata:
labels:
app: sql-sitecore
name: sql-sitecore
spec:
externalName: sitecorerdsmssqldbdbinstance.ccysvgfv15nu.eu-north-1.rds.amazonaws.com
selector:
app: sql-sitecore
type: ExternalName
status:
loadBalancer: {}

2d. Apply this file using kubectl

kubectl apply -f .\sql-sitecore.yaml
service/sql-sitecore created
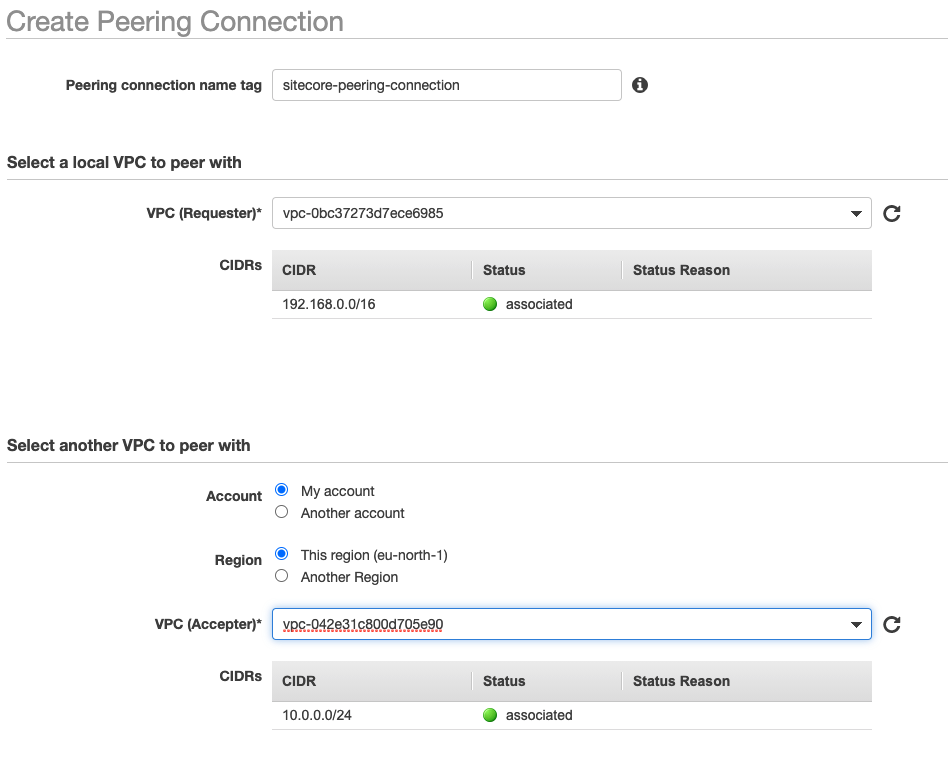
Creating the Peering Connection#

The real magic is now building a peering connection between our RDS and EKS VPCs. This allows the two VPCs to share network connections!

3a. In the AWS Console VPC section, select Create Peering Connection. Let the Requester be the EKS VPC, and the Accepter be the RDS VPC

img img

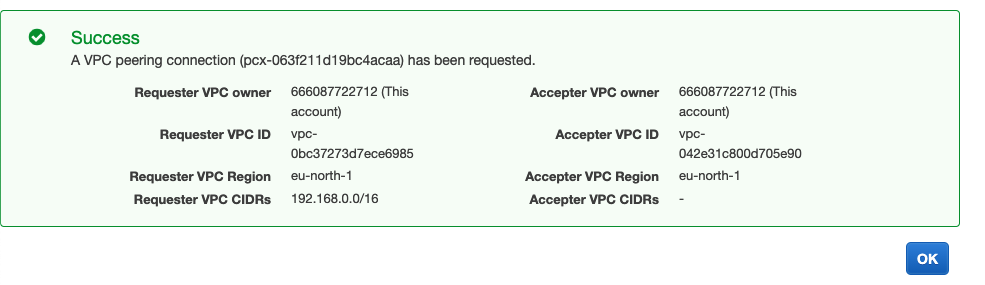
3b. Once created, right click on your new Peering Connection to Accept it.

img

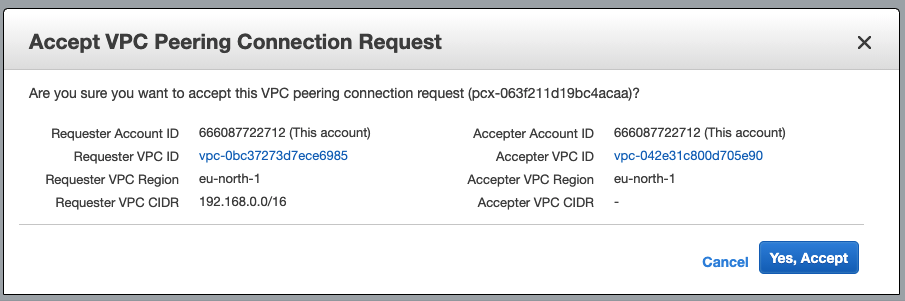
3c. Add the Peering Connection ID as an environment variable:

$Env:VPC_PEERING_CONNECTION_ID="pcx-063f211d19bc4acaa"
Updating EKS and RDS to use the Peering Connection#

4a. Now, let's find the corresponding route table for our EKS VPC

aws ec2 describe-route-tables --filters Name="tag:aws:cloudformation:logical-id",Values="PublicRouteTable" | jq '.RouteTables[0].RouteTableId'
"rtb-0dbf0e3285765ee7e"

4b. Add this ID as an environment variable

$Env:EKS_ROUTE_TABLE_ID="rtb-0dbf0e3285765ee7e"

4c. Update the EKS route table to send all RDS-directed traffic through the peering connection

aws ec2 create-route --route-table-id $Env:EKS_ROUTE_TABLE_ID --destination-cidr-block 10.0.0.0/24 --vpc-peering-connection-id $Env:VPC_PEERING_CONNECTION_ID
{
"Return": true
}

4d. Update the RDS route table to send all EKS-directed traffic through the peering connection

aws ec2 create-route --route-table-id $Env:RDS_ROUTE_TABLE_ID --destination-cidr-block 192.168.0.0/16 --vpc-peering-connection-id $Env:VPC_PEERING_CONNECTION_ID
{
"Return": true
}

4e. Lastly, ensure port 1433 is open to traffic coming into the RDS VPC from the EKS cluster

aws ec2 authorize-security-group-ingress --group-id $Env:RDS_VPC_SECURITY_GROUP_ID --protocol tcp --port 1433 --cidr 192.168.0.0/16

That was a lot! Separating VPC's is not trivial, but a cloud networking good practice you're going to want to get into the habit of.

References#
  1. https://dev.to/bensooraj/accessing-amazon-rds-from-aws-eks-2pc3